Resetting a Cisco Meraki switch is sometimes necessary for troubleshooting, reconfiguration, or repurposing. This article provides step-by-step instructions for resetting Meraki switches, ensuring you have a clear guide for the process. Whether you’re dealing with persistent connectivity issues or transferring ownership of the device, understanding the reset process is crucial for all types of network equipment, including Meraki switches and other Cisco Meraki hardware. With Meraki’s user-friendly design, performing a reset is straightforward, but it requires attention to detail to avoid data loss or misconfigurations.
This guide explains the steps to reset a Meraki switch, including performing a factory reset and best practices to ensure a seamless process. By following these instructions, you can restore your Meraki switch or other equipment to optimal performance while minimizing potential issues.
Resetting a Meraki switch becomes necessary in several situations, including:
A soft reset involves rebooting the switch without erasing its configurations. This is useful for minor troubleshooting, such as resolving temporary connectivity glitches. Performing a soft reset allows the switch to restart its processes, clear temporary files, and restore normal operation without impacting the network’s configurations.
To perform a soft reset:
A soft reset is ideal for addressing transient issues without disrupting the network’s configuration.
A factory reset restores the switch to its default settings, removing all configurations and customizations. This option is ideal for:
A factory reset requires the device to be powered on, but it does not need to be connected to the network.
When performing a factory reset, keep in mind:
Important: Always back up the switch’s configuration before performing a factory reset to avoid losing critical data or network settings.
The reset button is a fundamental feature on Cisco Meraki devices, including every Meraki switch, designed to help users restore the device to its original factory settings when needed. Whether you’re troubleshooting persistent issues or preparing the switch for a new deployment, understanding how to properly use the reset button is essential for maintaining optimal network performance.
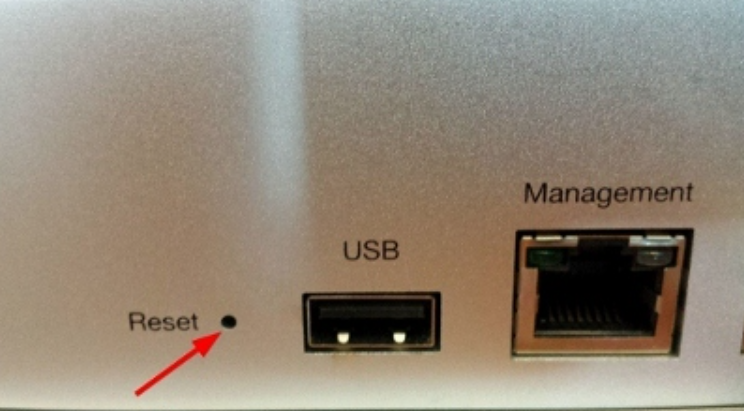
On most Meraki switches, the reset button is a small, recessed component located on either the front or back panel of the device, often near the status light. The exact location can vary depending on whether you’re working with a rack-mounted or compact switch, so it’s important to identify the correct spot before beginning the reset process. Refer to your device’s documentation or look for a clearly labeled button, typically accessible with a paper clip or similar pointed tool.
To initiate a factory reset, press and hold the reset button using a paper clip for the recommended duration. During this process, pay close attention to the status light—its behavior will indicate the progress of the reset. For example, the status light may begin blinking or cycling through colors, signaling that the reset process is underway. Once the reset is complete, the device will automatically reboot and attempt to reconnect to the Meraki dashboard.
It’s important to note that performing a factory reset will erase all local configuration, including static IP address settings and the DHCP lease pool. This means any custom network settings, static IP assignments, or other local configurations will be lost, and the switch will revert to its default factory state. Before proceeding, always back up your device’s configuration to avoid losing critical settings.
After the reset, you can access the local status page to verify the device’s current settings and confirm that the reset was successful. If the switch is unable to reconnect to the network or the reset process does not complete as expected, check the status light for error patterns and refer to the device’s manual for troubleshooting steps. In cases where the device remains unresponsive or fails to restore connectivity, contacting Meraki support is recommended for further assistance.
By understanding the function and proper use of the reset button, you can confidently perform a factory reset on your Cisco Meraki switch, ensuring a smooth restoration process and reliable network operation.
Before resetting your Meraki switch, take the following preparatory steps:
After resetting, the device will need to download its latest configuration from the dashboard, which could take up to 5-10 minutes. If you hold the reset button after the switch reboots, it will enter factory test mode; rebooting the device will return it to normal behavior. If a static IP address was previously configured, it will need to be set again using the local status page after the reset.
Always export the current configuration through the Meraki Dashboard before performing a reset. This ensures that critical settings can be restored if needed. Backups should be stored securely and updated regularly.
Pay attention to the status lights during the reset process. These indicators provide visual confirmation of the reset’s progress and completion. Refer to the device’s manual for detailed explanations of the light patterns.
Only reset a switch when absolutely necessary. Frequent or unnecessary resets can lead to network downtime, potential configuration errors, or unnecessary disruptions to users.
If pressing the reset button does not trigger the reset process:
If the switch cannot be reclaimed in the Meraki Dashboard:
To ensure the reset was successful:
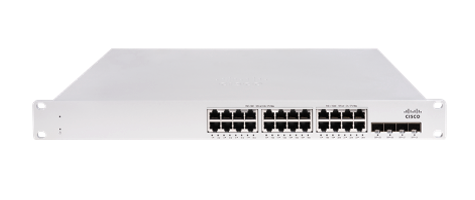
Cisco Meraki switches, including the MS series, offer intuitive management through the cloud-based Meraki Dashboard. This simplifies network administration and provides real-time insights.
Meraki switches are built to deliver consistent performance with advanced features such as Layer 3 routing, PoE capabilities, and seamless integration with other Meraki devices. The reliability of these switches ensures minimal downtime and maximum productivity.
With extensive documentation and responsive customer support, Cisco Meraki ensures that organizations can deploy and manage their networks confidently. The Meraki community and resources provide additional help for troubleshooting and optimization.
Resetting a Meraki switch is a straightforward process that can help resolve issues, reconfigure devices, or prepare switches for new deployments. By following the proper steps and best practices outlined in this guide, you can ensure a smooth reset experience without unnecessary complications.
If you need assistance with your Cisco Meraki products or are looking for expert advice on network solutions, contact Stratus Informational Systems today. We’re here to help you get the most out of your Cisco Meraki devices, ensuring secure and efficient network management. management.